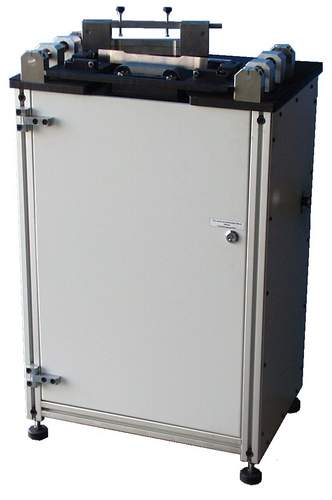
Specimen grinding / finishing machine
for blanked / laser cut / milled sheet metal tensile specimens
The basic requirement for obtaining correct results from tensile tests on sheet metal is the specimen itself, correct dimensions, finished surface at the edges and correct preparation in general without affecting the mechanical properties of the tensile specimen.
Punching is the most effective and economical method of specimen preparation when it is possible to quickly and effectively remove the work-hardened zone / edge damage from the specimen. The PSM 2000 sheet metal tensile testing machine (well known since 1970) has been redesigned to meet this requirement perfectly and quickly. The machine is so easy to use that even an unskilled worker can produce high quality specimens after a few minutes training. The specimens are perfectly parallel in gauge length (within 0.02mm parallelism). The grinding process takes less than 2 or 3 minutes (depending on the type of specimen). The quality meets and complies with the requirements of all testing standards (ISO 6892-1 / ASTM E370, JIS ...) and the IDDRG (International Deep Drawing Research Group).
The machine is under continuous improvement and we are currently building the fifth generation. The grinding belt is tensioned by a pneumatic system. This increases the comfort and also the reliability of the grinding parallelism. PSM2000 the synonym for highest quality in tensile specimen preparation. Suitable for blanked specimens and also for specimens cut by laser, water jet, milling and others.
The machine is equipped with an industrial quality abrasive belt of 2000 mm length. The grinding speed of the belt corresponds to the speed required for the grinding process on metal (15 metres per second) and has a large surface for the grinding consumables (surface 2000 mm in length x 100 mm in width = 200,000 mm²). For special requirements, we are able to supply special abrasive belts with cooling function or for special materials such as titanium, stainless steel, carbon steel and more. Some of our customers also use aluminium oxide abrasive paper to enable this machine to be used for sample grinding for spectral analysis (so as not to contaminate the metal with carbon from the SiC paper).
Finally done: The new PSM2000-A sample grinding machine was registered for patent at the beginning of July 2023
Fully automatic specimen grinding machine for tensile specimens made of sheet metal
Video specimen grinding machine PSM 2000-A2
Video
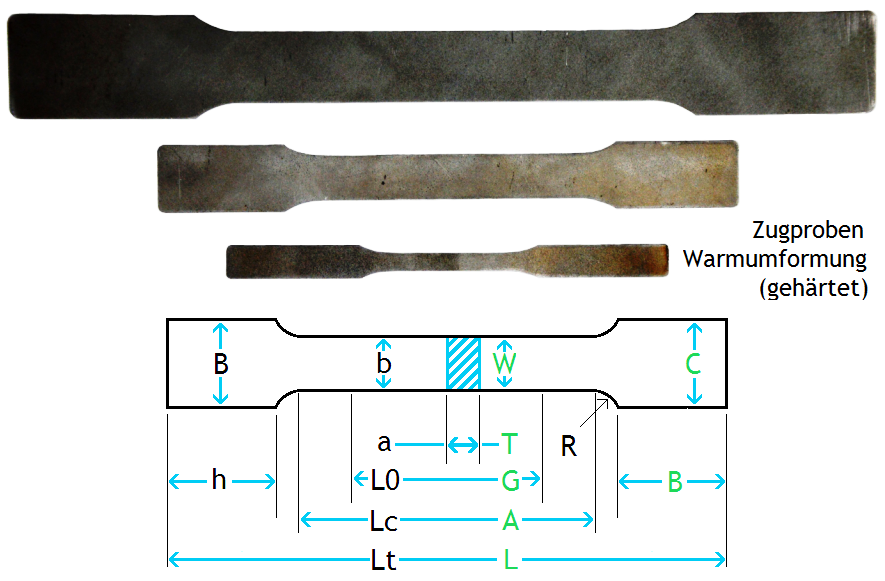
Sheet metal tensile specimen - shapes according the different standards
Die Probenschleifmaschine kann für alle unten gezeigten Zugproben ausgelegt werden

| Identifier | ISO6892 B1-1 | ISO6892 B1-2 | ISO6892 B1-3 | Press hardening | ASTM E8/E8M | ASTM E8/E8M | JIS | GOST | GOST | |
ISO | ASTM | |||||||||
Lt | L | 200 | 250 | 200 | ~136 | 200 (min.) | 100 | 200 |
| 151.2 |
B | C | 20 | 30 | 35 | 9 | 20 | 10 | 35 |
| 20 |
h | B | ~50 | ~50 | ~55 | 45 (min.~45) | >50 min | >30 | ~55 |
| ~40 |
R | R | 20 | 20 | 25 | 15 | 20 (min.12.5) | 15 (min.6) | 25 |
| 15 (min.6) |
Lc | A | 75 (min.57) | 120 (min.90) | 60 (min.) | 36 | 75 (min. 57) | 36 (min.32) | 60 |
| 36 |
L0 | G | 50 | 80 | 50 | 30 | 50 +1 | 25 +1 | 50 |
|
|
b0 | W | 12.5 +1 | 20 +1 | 25 +1 | 5 | 12.5+0,2 | 6 + 0..1 | 25 |
| 12.5 |
| a | T | < 19 | < 6 | |||||||
Lc paralism | 0.06 | 0.12 | 0.12 | 0.06 | 0.05 | 0.02 | 0,1 |
|
| |
b+ | punch with oversize to remove damaged edge / cold hardened zone by grinding | |||||||||
Contour grinding with high quality - Illustration of working principle
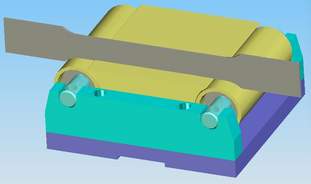
sheet metal tensile specimen is positioned (for demonstration) on the grinding belt. The grinding belt respectively the grinding head with pulley rollers are shaped like the tensile specimen (including the radius). Within on two minutes (including specimen loading) the damaged / cold hardened zone from punching will be removed by finishing with grinding paper. All influencing deformations and failure of specimen (like cold hardened zone from blanking, micro cracks, material compression, material deforming) will be removed completely.
These abrasive technology generates no heat. Because of the low temperatures (up to about 60 degrees C) the material characteristics are not influenced. To change the mechanical properties of the specimens a temperature of >120 degrees are required fare away what grinding process will bring up.
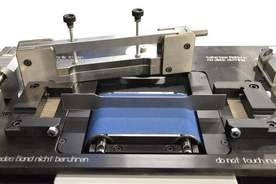
For different specimen shapes different grinding heads (with different distances of pulley rollers) and different specimen holders are available. The exchange of this heads is possible in less than 2 minutes. Because of very special design now we are able to support also specimens with Lc of only 36 mm/ L0 of 30 mm (at radius 15 mm) can be finished.
Typical specimens shapes: A80 / A50 / ASTM A370 / JIS / A30
Grinding head with grinding belt rollers is designed exact according specimen shape (reduced section including radius)
The finishing process for a specimen for a sample batch (up to 15 mm) for:
- specimen loading
- grinding both sides
- take off the specimens
takes only 2 minutes
The specimen quality is higher than every other method for finishing sheet metal tensile specimens. Valid is also the statement of industry: If r+n values are required the specimen grinding machine cant be missed indispensable.
Because from sheet metal plate to "ready to test" tensile specimen takes only three minutes (including blanking the specimen this is just THE system suitable for low and medium throughput within a short time.
... even if the loaded truck with coils is waiting to receive the final acceptance / release of tensile test.
The specimen grinding machine PSM 2000 is one of the most recognized principles in the field of sample preparation for tensile tests on sheet metal. In some particularly sensitive to reactive materials is the only adequate system to remove the damaged edges - because even a high precision CNC milling machine will change the properties of this sensitive material.
More and more, this machine is also required for the tensile test specimens of particularly hardened specimens with low elongation (Keywords: hot forming, hot forming dies, hot stamping, press hardening, machining of hardened tailored blanks).
Thus, with this grinding process, also samples with tensile strength of 1600 MPa or higher can be finished.
The specimen grinding PSM2000 is now used for solving this particular problem of high-strength sheet / hot stamping tensile specimens from the following companies:
Customer | State | ZIP Town |
VOLKSWAGEN AG | DE | 38436 Wolfsburg |
VOLKSWAGEN AG | DE | 38436 Wolfsburg |
VOLKSWAGEN AG | DE | 38436 Wolfsburg |
VOLKSWAGEN AG | DE | 38436 Wolfsburg |
BRAUN-CarTec GmbH | DE | 66773 Schwalbach |
MAGNA IHV GmbH | DE | 73441 Bopfingen |
Magna International Stanztechnik GmbH | DE | 37308 Heiligenstadt |
BENTELER Automotive Rumburk s.r.o | CZ | 408 01 Rumburk |
Mubea Transmission | DE | 58586 Weitefeld |
voestalpine Polynorm GmbH & Co. KG | DE | 73529 Schwäb Gmünd |
Benteler Automotive SK s.r.o. | SK | 901 01 Malaky |
voestalpine Stamptec GmbH | DE | 04626 Schmölln |
Cosma Engineering Europe AG | DE | 02722 Weikersdorf |
HQM induserv GmbH (third party lab) | DE | 08058 Zwickau |
Gestamp Griwe Hot Stamping GmbH | DE | 37339 Haynrode |
GEDIA Gebrüder Dingerkus GmbH | DE | 57439 Attendorn |
Voestalpine Automotive Body Parts Inc. | US | WHITE GA 30184 |
TWB Company, L.L.C. | US | MI 48162 Monroe (Michigan) |
Benteler Automotive SK s.r.o. | CZ | 463 31 Chrastava |
Ford Werke Saarlouis | DE | 66740 Saarlouis |
Benteler ?R, s.r.o. | CZ | 438 01 atec |
LINDE + WIEMANN Stanztechnik GmbH | DE | 01920 Elstra |
* further companies - total 210 * |
|
Indispensable this grinder will be if the specimens are hot deformed and cured in the mold: The samples can be machined only by such as lasers or wire EDM. Afterwards, however, the edge of the thermal influence (laser, etc.) must be freed.
When it comes to quality of the sample preparation grinding is essential for critical materials. So this machine is at almost all manufacturers of car seat safety systems related components: seat rails:
- CRH Solingen
- CRH USA - Alabama
- BROSE Coburg
- BROSE CANADA
- BROSE Tschechien
- FAURECIA Stadthagen
As simple the technique as unbeatable the application and resluts. Also because unskilled workers may prepare high quality specimens.
You are using an extensometer to measure the elongation until rupture? The specimen grinding machine also is suitbale to solve your problems of rupture the tensile specimen outside of measuring knives: If required we can do a special reduction of grinding desk: This will cause a sidecut of your specimens 0.04 each side. Finally your specimens will brake just in the middle of the receive correct results in elongation.
Tensile specimen blanking machines, punching tools and specimen grinding machine are available for forces of 10 7'500 kN and for standards according ISO / DIN / EN, ASTM, BS, Afnor, Jis, Ghost, etc. This systems are suitable for sheet metal specimen preparation for thicknesses from 0.03 up to 13 mm.


